WebSockets with Spring Boot
By Josh Wood
- 10 minutes read - 2034 wordsIn traditional web applications, it’s only possible to interact with the server via a request and wait for a response. With modern interactive applications, this approach is not ideal for any user interaction when we want to get updates from the server without having to continuously make requests to learn if anything interesting has happened on the server. The solution is to provide a bi-directional, persistent means of communication between the client and the server. This is where WebSocket comes in.
WebSocket is a communication protocol over a TCP connection which provides full-duplex, or bi-directional communication. WebSocket is also persistent, so the client is able to open a connection, and retain that connection with the server for the duration of the client’s session, unlike HTTP which is just a single request, response, then close the connection. These properties of WebSocket make it ideal for real-time communication between clients and servers. Let’s take a look at how to set up a very basic WebSocket connection with Spring Framework.
Create and Configure the Project
To start off, we need a new spring based project. You can use any tool you wish, but to follow along here you can use Spring Initializr. Once on the page, choose your preferred build tool, Maven or Gradle (I’ll be using Maven), keep the default selected version of Spring, fill in the group and artifact data (for me it will be com.joshmlwood and websocket-demo, and we’ll use the (currently) default version of Java 8.
Now, we need to add the WebSocket starter to the project under dependencies, and we can click the Generate button. We now have a zip file that is a basis for our Spring Framework 5.x, and Spring Boot 2.x based application. Your pom file should resemble the snippet below.
    <parent>
        <groupId>org.springframework.boot</groupId>
        <artifactId>spring-boot-starter-parent</artifactId>
        <version>2.1.4.RELEASE</version>
        <relativePath/> <!-- lookup parent from repository -->
    </parent>
    <dependencies>
        <dependency>
            <groupId>org.springframework.boot</groupId>
            <artifactId>spring-boot-starter-websocket</artifactId>
        </dependency>

        <dependency>
            <groupId>org.springframework.boot</groupId>
            <artifactId>spring-boot-starter-test</artifactId>
            <scope>test</scope>
        </dependency>
    </dependencies>
Application Configuration
If you used Spring Initializr to create your application, you should already have a @SpringBootApplication annotated main class. This gives us a base Spring application to work with and build from.
We now need to configure and enable a WebSocket broker in our application. To do so, we create a new configuration class that implements WebSocketMessageBrokerConfigurer and is annotated with @EnableWebSocketMessageBroker.
@Configuration
@EnableWebSocketMessageBroker
public class WebSocketConfig implements WebSocketMessageBrokerConfigurer {
    @Override
    public void configureMessageBroker(MessageBrokerRegistry registry) {
        registry.enableSimpleBroker("/topic");
        registry.setApplicationDestinationPrefixes("/app");
    }

    @Override
    public void registerStompEndpoints(StompEndpointRegistry registry) {
        registry.addEndpoint("/websocket");
        registry.addEndpoint("/sockjs")
                .withSockJS();
    }
}
We’ve overridden two methods from our WebSocketMessageBrokerConfigurer to provide a basic configuration for our application. The configureMessageBroker method sets up a simple (in-memory) message broker for our application. The /topic designates that any destination prefixed with /topic will be routed back to the client. We’ve also configured ‘application destination prefixes’ of just /app. This configuration allows Spring to understand that any message sent to a WebSocket channel name prefixed with /app should be routed to a @MessageMapping in our application.
It’s important to keep in mind that using the simpleMessageBroker will not work with more than one application instance and it does not support all of the features a full message broker like RabbitMQ, ActiveMQ, etc… provide.
Here we’ve also registered some STOMP (Simple Text Oriented Messaging Protocol) endpoints. STOMP is simply a nice abstraction on top of WebSocket to allow us to send text (think JSON) as our message payload. Without STOMP, we would need to rely on some other higher level message protocol, or use the WebSocket TCP transport layer raw which would be much less user-friendly for our server and our client. The endpoint /websocket will allow us to connect to ws://localhost:8080/websocket with the default Spring port configuration. Interestingly we also have this /sockjs endpoint. This endpoint is special as it uses the SockJS fallback protocol which allows a client which does not support WebSocket natively mimic a WebSocket over an HTTP connection. So for the SockJS endpoint, our connector string would look like http://localhost:8080/sockjs. This is just here as an exercise to show it’s possible to configure a fallback if you need to support very old browsers or a client that doesn’t support WebSocket natively, but we won’t use it for the remainder of the post.
Make the Payload Model
We need a model to represent the state transfer between the client and the server. We can start off with something very simple, just a simple POJO with a from and message field will suffice.
public class Message {
    private String from;
    private String message;

    public Message() {
        // required for Jackson
    }

    // constructor and getters
}
This will allow us to use Spring’s default implementation of Jackson Object Mapper to convert our messages to and from JSON strings.
Create a Message Controller
Much like in Spring Web MVC (MVC and Rest endpoints), we have the idea of a “controller” which hosts the topic endpoints to send and receive messages over our WebSocket.
@Controller
public class MessageController {

    @MessageMapping("/send")
    @SendTo("/topic/messages")
    public Message send(Message message) {
        LocalDateTime timestamp = LocalDateTime.now();
        return new Message(message.getFrom(), message.getMessage(), timestamp);
    }
}
This controller looks a lot like a rest controller, but instead of using a @RequestMapping, we use a @MessageMapping to add a hook for receiving messages on the /app/send topic. An important difference, however, is that we use @SendTo annotation to instruct Spring to write the return value of our method to the /topic/messages topic, which our client will be subscribed to. In this method, we are going to just forward the message content as received, but add a timestamp from the server to help differentiate messages that originated from a client and ones that originated from the server.
Create a Client
Now that we have a server waiting to send and receive requests on our WebSocket, we need a client to actually connect to it. To keep things simple, we can just create a basic static HTML page with Query to provide some interaction.
To start, create an HTML page, and in the header add at a minimum, jQuery and StompJS from CDN. You can also add SockJS if you’d like to experiment with backward compatibility, but it isn’t a requirement.
    <script src="https://cdnjs.cloudflare.com/ajax/libs/jquery/3.3.1/jquery.js"></script>
    <script src="https://cdn.jsdelivr.net/npm/@stomp/[email protected]/bundles/stomp.umd.js"></script>
    <script src="https://cdn.jsdelivr.net/npm/sockjs-client@1/dist/sockjs.min.js"></script>
To style things a little more nicely, I’ve also added Bootstrap, but that is just to make it looks a little prettier than basic HTML layout and is not required.
Now that we have the required libraries included, we can make some HTML for our controls to connect, disconnect, a form to send messages, and a table to hold the responses from our server.
<div class="container" id="main-content">
    <div class="row">
        <div class="col-md-10">
            <form class="form-inline">
                <div class="form-group">
                    <label for="connect">WebSocket connection:</label>
                    <button class="btn btn-default" id="connect" type="submit">Connect</button>
                    <button class="btn btn-default" id="connectSockJS" type="submit">ConnectSockJS</button>
                </div>
            </form>
        </div>
        <div class="col-md-2">
            <form class="form-inline">
                <div class="form-group">
                    <button class="btn btn-default" disabled="disabled" id="disconnect" type="submit">
                        Disconnect
                    </button>
                </div>
            </form>
        </div>
    </div>
    <div class="row">
        <div class="col-md-12">
            <form class="form-inline">
                <div class="form-group">
                    <label for="from">Username:</label>
                    <input class="form-control" id="from" placeholder="Username..." type="text">
                    <label for="message">Message:</label>
                    <input class="form-control" id="message" placeholder="Your message here..." type="text">
                </div>
                <button class="btn btn-default" id="send" type="submit">Send</button>
            </form>
        </div>
    </div>
    <div class="row">
        <div class="col-md-12">
            <table class="table table-striped" id="responses">
                <thead>
                <tr>
                    <th>Messages</th>
                </tr>
                </thead>
                <tbody id="messages">
                </tbody>
            </table>
        </div>
    </div>
</div>
Now that we have the skeleton of the HTML out of the way, we can write some functions to handle connecting, disconnecting, sending messages, and receiving messages.
var stompClient = null;
function connect() {
    stompClient = new window.StompJs.Client({
        webSocketFactory: function () {
            return new WebSocket("ws://localhost:8080/websocket");
        }
    });
    stompClient.onConnect = function (frame) {
        frameHandler(frame)
    };
    stompClient.onWebsocketClose = function () {
        onSocketClose();
    };

    stompClient.activate();
}
Starting with the connection function we will create a global variable to hold our Stomp Client then uses the StompJS library to create a new instance. We’ve given our client a configuration object to provide an anonymous function for a WebSocket factory. This is to ensure that we use the browser’s built-in WebSocket object, and are connecting to the correct URL. It would be trivial to parameterize the URL in the connect function and store it as an external configuration as well. In the instance that we would like to use SockJS instead of the browser’s built-in WebSocket implementation, we can just replace the return of that anonymous function with new window.SockJS("http://localhost:8080/sockjs");. Keep in mind here, we use the window keyword since we’ve registered the SockJS library as a global library in the browser window. In a modern web app with Angular or React, you would probably just use an import local to the component using it and it would then be accessible with just the new command like new SockJS(...).
We have also assigned some functions to the onConnect and the onWebsocketClose hooks.
function onSocketClose() {
    if (stompClient !== null) {
        stompClient.deactivate();
    }
    setConnected(false);
    console.log("Socket was closed. Setting connected to false!")
}
The onSocketClose function is helpful to properly update our view so that when we lose the connection or close the connection to the socket, the user has some context that has happened. Here we can also see the setConnected function which is responsible for handling the display changes when our socket connects or disconnects:
function setConnected(connected) {
    $("#connect").prop("disabled", connected);
    $("#connectSockJS").prop("disabled", connected);
    $("#disconnect").prop("disabled", !connected);
    if (connected) {
        $("#responses").show();
    } else {
        $("#responses").hide();
    }
    $("#messages").html("");
}
Now we need to write a method to handle the messages that are sent from the server.
function frameHandler(frame) {
    setConnected(true);
    console.log('Connected: ' + frame);
    stompClient.subscribe('/topic/messages', function (message) {
        showMessage(message.body);
    });
}
This frameHandler function takes in an object called frame. Each frame may represent a different state of the WebSocket or messages pushed from the server. Mozilla has great documentation on WebSockets that is worth a glance. What is important to us is that when we receive a frame, we will be connected and we will want to subscribe to a topic from our server. This topic will be where the server will write messages destined for the client. We also have a function callback that is responsible for handling each message sent from the server. The message here is just a string message (since we’re using STOMP as our protocol over WebSocket). The implementation below is just to prepend the newest message to the top of our messages table we created earlier.
function showMessage(message) {
    var msg = JSON.parse(message);
    $("#responses").prepend("<tr>" +
        "<td class='timeStamp'>" + msg['timeStamp'] + "</td>" +
        "<td class='from'>" + msg['from'] + "</td>" +
        "<td>" + msg['message'] + "</td>" +
        "</tr>");
}
Now we also need the ability to send a message to the server.
function sendMessage() {
    stompClient.publish({
        destination:"/app/send",
        body: JSON.stringify({
            'from': $("#from").val(),
            'message': $("#message").val()
        })
    });
}
This function instructs the stopClient to publish a message on the topic /app/send with a body containing our inputs from the HTML form. Once the stop client publishes to this topic, the server will receive the message, route it to our @MessageMapping with the configured /send topic destination.
We should also have a manual disconnect method to close out the connection to the WebSocket, just for demonstration purposes. It simply deactivates the StompClient (and all subscriptions) if the client is not null.
function disconnect() {
    if (stompClient !== null) {
        stompClient.deactivate();
    }
    setConnected(false);
    console.log("Disconnected");
}
The last bit we need to do to get a functional client is to set up jQuery listeners on our buttons and configure a document ready function.
$(function () {
    $("form").on('submit', function (e) {
        e.preventDefault();
    });
    $("#connect").click(function () {
        connect();
    });
    $("#connectSockJS").click(function () {
        connectSockJs();
    });
    $("#disconnect").click(function () {
        disconnect();
    });
    $("#send").click(function () {
        sendMessage();
    });
    $("document").ready(function () {
        disconnect();
    });
});
If we place our HTML file in the application’s resources directory, named demo.html (src/main/resources/static/demo.html) we will be able to access http://localhost:8080/demo.html when we start the application up.
Screenshot
Here’s how my demo page looks with Bootstrap styling.
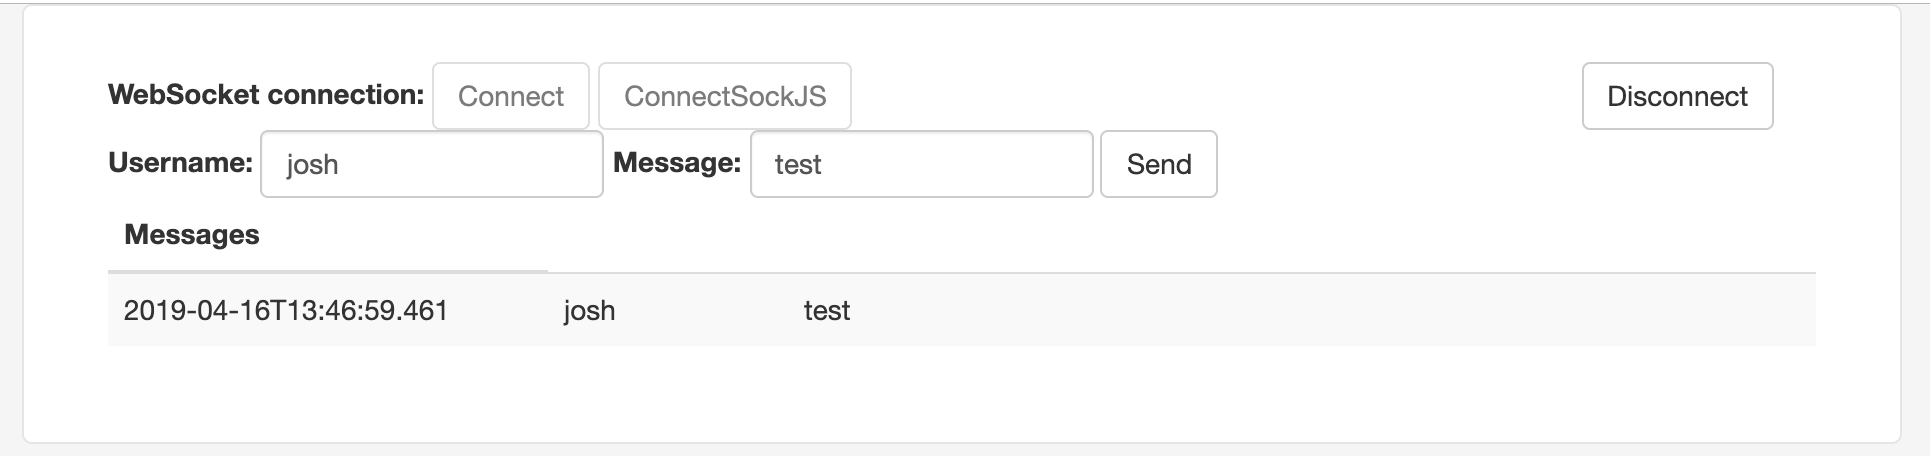
We can see that the from was ‘josh’ and the message was ’test’, and we also see that the server attached a timestamp to the message for when it was received.
Initially configuring a WebSocket seems like a daunting task, but once the basics are out of the way it’s a relatively simple implementation especially when making use of the implementations provided by the Spring team.
Get the code
If you want to just get the demo application, see my repository on GitHub (Simple Spring Websockets Demo)